Jigs
Basically a jig helps you to do a repetitive task over and over with precision. When I first came to Dorset none of the printers were doing reductive printing. The inking was done all at once on one stone and if need be they’d use stencil to embellish certain areas based on the artists drawings.
I found an old Japanese Kento registration block in storage so there had been an attempt to teach the printers how to print multiple matrix onto one sheet of paper. It was made of 1/4” furniture grade softwood plywood cut to easily place paper in relation to the image. you can see that the “image area” is marked as 9”x12”, this is the area that would be cut and recut over a series of evolutions making this block a one time thing. Along with the Kento there were 50 or so wood block experiments carefully wrapped and labeled but no evidence of the prints associated with them. Naboru Sawai was a visiting artist at some point (?) so that would account for the myriad of Japanese printmaking tools that abound around the shops.
For an individual artist living near a hardware store this method of relief printing is ideal. For us in the arctic the stone block yields many image opportunities for many years and the look is more of an engraved line than a wood cut line which is preferred.
I will not pretend to understand the intricacies of Japanese Woodblock printing but if you are interested go to
http://www.imcclains.com/catalog/books/japanesewoodblock.html
and
http://www.imcclains.com/catalog/books/artandcraft.html
both recommended by the fine folks at McClain’s, one stop shop for all things relief printmaking.
http://www.imcclains.com/
We buy all of our Japanese paper from the Japanese Paper Place in Toronto.
http://www.japanesepaperplace.com/index.htm

Kento block used for registration
Out of this need grew the jigs we use today. It is basically a sheet of plywood the size of a half sheet (or full size) of Kuzuki Kozo paper. Along the long side of the plywood base attach a piece of 3/4” x 3”- 4” strapping glued and screwed onto the plywood base. Attach an identical piece of strapping to sit on top of the first one to give a depth similar to the slate stone blocks used. Another piece is attached by hinges on the outside edge of the lower secured piece and the "live" piece and remains movable. There are no adjustments.
Pins
We have taken plastic push pins and smashed the plastic away to use the pins, they work well. We have also used fine finishing nails ground to fine sharp points and heavy needles cut to fit into the side pieces that are attached to the plywood base.

The minimum number of pins should be 3 but for longer jigs we have used up to 9! The more pins you use the more secure the registration will be but it will take you more time to insert the paper each time you pull a print.
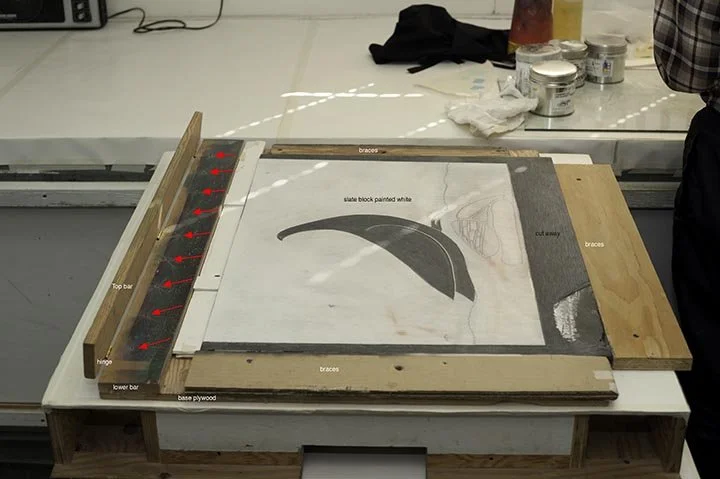
Detail: Top bar has the holes to receive the pins and is hinged to the bottom bar which is fixed and has the pins marked with red arrows.A detailed view below. You can see that the pins were sharpened with files in situ to suit the printers requirements.
The pins are inserted knowing that the pin marks on the paper will later mark the edge that will determine that edge of the edition paper. After the edition is completed a heavy straight edge is placed along the pin holes and the excess paper is torn away to give the paper a torn edge appearance, we never cut the paper with a blade.
If you place the pins one inch from the non hinged edge of the lower boards that would give you enough paper to be able to tear the paper securely, less may make tearing the paper a challenge and more is just wasting paper.
The holes for the pins should be pre drilled with a fine drill. Wrap a piece of tape around the drill bit or use a block of wood to limit the depth of the drilled hole so the pins will protrude the same height. Fix the pins 90 degrees to the surface of the jig to make your job easier when it comes to attaching the paper before printing and removing it afterwards. Orient the pins at equal distances along the lower board and add a drop of super glue to base of each pin then force them into the holes to the same depth.
Sandwiched between the pieces of strapping are three or more needles or pins driven into the lower piece and out an inch from the outer (hinged) edge of the wood in a parallel line equal distance apart. The upper hinged piece of wood is pushed onto the pins to form the pockets to receive the pins once the piece is closed shut. The closed piece serves to protect the printer from the invisible sharp pins, which we all bear the scars from, and a way to lock the paper securely in place so the paper doesn’t pop out when the sheet is drawn firmly over and on top of the inked block.

You can see that the slate is thinner than the base for the hinged portion of the jig. You can add material between the base of the jig and the stone to raise it up so when the paper is locked into the jig it will be level to the surface of the stone, this is important.
Once the stone block is in its final position it is screwed and wedged into place so the block will not move. All sorts of gismo’s have been used to position the block firmly into place. Sometimes the blocks are so thin that cardboard and wood backers are used to raise the block so the printing surface is level with the lower strap so the paper rests flush.

A are the pins that have just been pushed through the paper.
B are the holes that receive the ins when the top bar is closed and secures the paper while printing.
C are guide marks that the printer uses to orient the paper to the jig and the image.
D is a wood screw used to secure the block to the base of the jig.
Paper Prep
Once the stone block is set in place and secured to the jig the paper has to be prepared for edition printing. As you can see in the above photo the pencil lines (C) help the printer to fine tune how the paper sits in relation to the block/image. Once you have determined the placement of the paper each sheet must be set onto the pins and perforated by lowering the upper hinged bar onto the pins. Be careful too of the papers surface, it has two. The screen or rough side and the smooth side. It depends on your own taste, Nancy Jacobi of the Japanese Paper place says that you can use either side but we always use the the smooth side, I find the ink sits more uniformly with less pressure after the printing process. The rough side requires heavier pressure to get to ink to sit uniformly on its surface.
Do each sheet and stack them ready to edition.
Template
Another detail that could be overlooked but isn’t with our printers. First of all the reason we paint the surface of the stone block white is so we can see the marks of the transferred image for cutting. As well the white helps to see the ink as it is applied to the image for printing. Roller marks, lap marks too thin or too thick amount of ink can be easily seen on a white background, not so on black.
As the block is inked it is common for the roller to deposit ink onto the non image area (negative space) and it can be hard to see with more transparent and darker colours of ink. The printers will ink up the image as best they can but then will go over the entire block to wipe up stray ink that would get on the printing paper during printing, spoiling the impression. Once they have done that the take templates of heavier gauged paper that have been cut to be placed over the non image area as an extra precaution. The template does not cover every bit of the negative space but only the large areas where the printing paper may sag into while printing.
The white paper has been applied to half of the non image area.
The white paper has been applied to half of the non image area.
Care is taken to place the template and not disturb the inked surface. If the ink is disturbed during the placing of the template it will print the imperfection spoiling the impression.
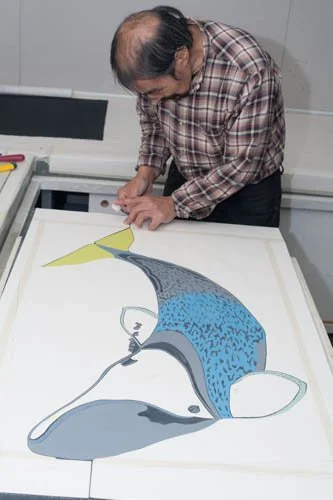
Qiatsuq is preparing the templates. Notice that there are templates in each of the flippers, the head and on each side of the body that cover the non image areas. He tapes the two sides of the template together so it doesn’t move during the printing process. Qiatsuq is known for his careful and deliberate manner, excellent attributes for
a stone cut printer.
It will also spoil the template if ink gets on the surface that touches the printing paper so the template will have to be replaced.
Proofing usual reveals the areas of any particular print that needs toe template. An easy way to make the template is to cut a piece of non printing paper and register it along with the other printing paper. You should also print a frosted mylar impression as well, more about that later. The impression on the non print paper could be an impression taken after an inked impression to get just the ghost of the image, you only need enough of an inked image to show you where to cut the template from. Take the impression of the non printing paper and turn it over to reveal the ghost and cover the ink with talc. Brush it smoothly over all of the ink tip off the remaining loose talc and polish the surface suing a Kimwipe or Webril (soft rag) wipe. You just want to be able to touch the paper without getting covered in ink. After your first real proof print you will see the areas where the impression has picked up stray ink from the no image area, this are should be included in in your template. Examine the proof carefully and make the template general enough for easy handling but detailed enough to cover every problem area. The template does not have to be in one piece, they rarely are, but keep it is as simple as you can easily manage.
Ink will accumulate on the bottom of the template, don’t worry about that because that it is what it is for. At the end of each print remove the template, clean the block (talc the bottom if really inky) and start again.

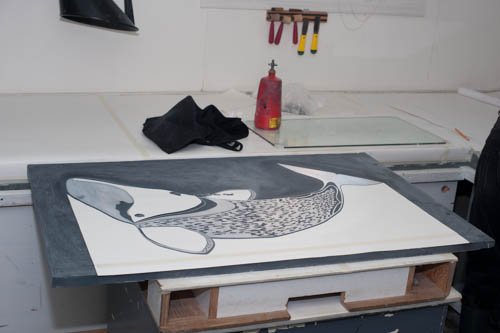
You can see the template in place on Ning’s Swimmers print. Qiatsuq is known for his careful and deliberate manner, an excellent attribute for any stone cut printer.

mylar printed using the pin registration. It is always important to remember to do this, it can get you out of a pickle if the block is bumped out of registration.
Mylar registration template: As mentioned previously printing a frosted mylar impression is critical if you are doing reductive printmaking in either etching, lithography or relief. The mylar is registered with the jig as any paper. No matter if the block moves on the jig or you need to redraw an area to be cut, the mylar will help you register the block to the paper again. Cut the frosted mylar (.003) the same size as your paper, punch the registration holes as you would paper and then print an impression of the area you’ll need later on. Here Qiatsuq has printed only the area he’ll need but if you are not sure print the entire thing. Once printed dust the ink side of the mylar with talc and careful buff until the ink has been coated completely.
The Kiss.

The Kiss.
Printing:
The block has been inked, templates in place and you are ready to take an impression. Hold the paper in your right hand so it dangles over the pins on the jig. Slowly one at a time insert the pins into their holes and lower the paper as you do so until all of the pins are in place, close the lock. Gently pull the paper toward the opposite edge of the block and lay the paper onto the inked block so there are no wrinkles, there is no going back.
The paper is now gently smoothed with your clean hand, in French this is called the “Kiss”. This begins the process of transferring the ink onto the paper. Once the hand has smoothed out the paper from the hinged lock to the outside edges coat the surface of the paper with a sheet of waxed paper.

Now use your baren to work from the centre of the block outward applying even pressure in a circular motion. You must be careful not to cut the paper on the sharp image edges now that the paper has been softened by the ink. Keep the baren horizontal to the paper surface, you can see the contrasting template and paper below to guide you, focus on the image area. Push gently but firmly into the baren feeling for any imperfection that may spoil your impression. You can always lift the outer edge of the impression an inch or so to see how the ink is transferring to the paper and if ou need more pressure. Once you are done with that it is time to spoon the image.

Spooning, not what you think.
Large soup spoons seem to be the favourites around the studio. The handles are usually padded by wrapping them with rags and then taped so the handles don’t dig into the palm of the printers hands. This is the final transfer of ink into the paper. Every bit of the surface must be spooned and you will see the image clearly through the paper.
In the two photos below you can see what the paper looks like as you begin and what it looks like after spooning for some time, the entire image should be clearly visible and if
you can see spoon marks they will be seen on the impression as well.


Qiatsuq's spoon. This impression is ready to remove from the block.
If this is a one colour print then the job requires that you lift the sheet off the stone, trim the registration holes off, chop and sign the edition. If this is stage one of a multiple colour print then you must recut the stone to remove the part of the image so the colour you just printed will remain leave the stone on the block that will over print your previous colours.


A very fine example of a reduction relief print by a true master.